Capturing Memories on Mars

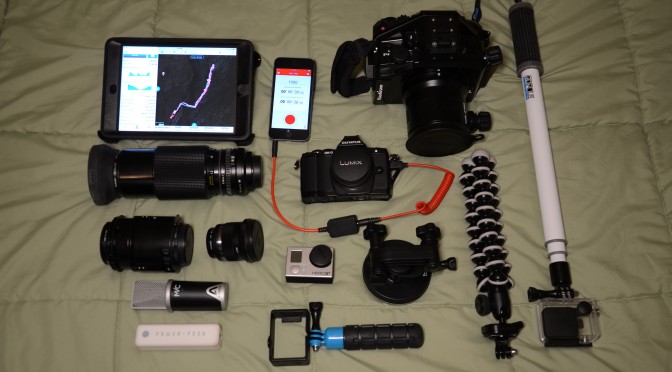
Having the unique opportunity to participate in HI-SEAS, I wanted to be able to capture every aspect of the mission. Here are the tools I’ve used to chronicle me experience here. If you’ve been following along you may know a little bit about my kit, but here is a mini-review of each one.

DSC_2681-labelled
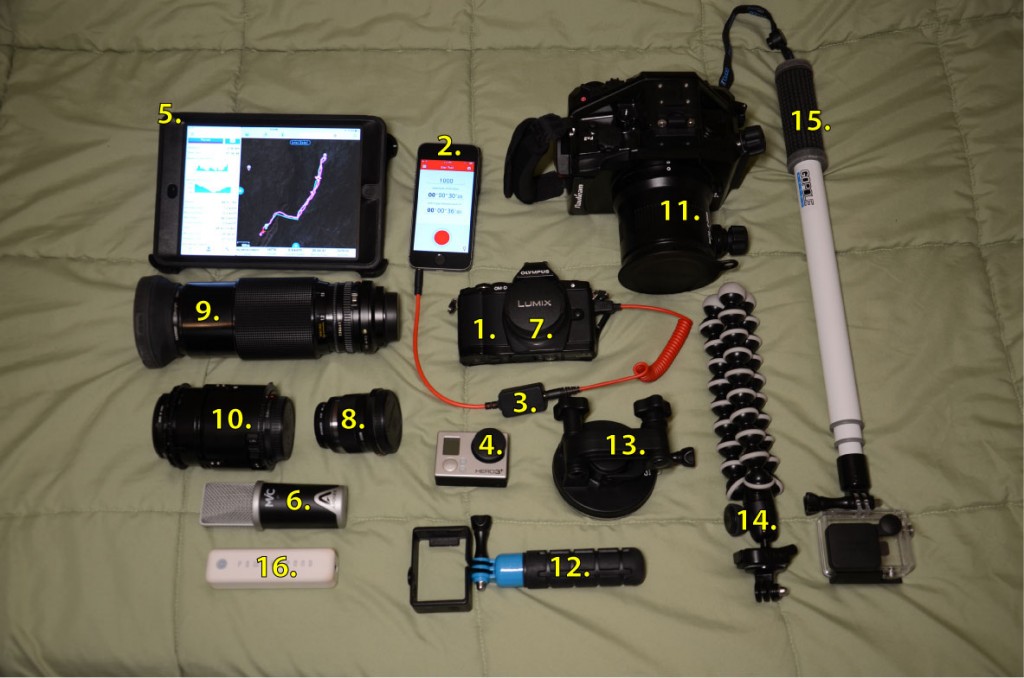
1. Olympus OM-D EM-5 (McBain)

This is my main camera for the mission, which I purchased specifically for taking stills and time lapses. The entirety of the photos in my Flickr Albums were taken with this camera. This is my first interchangeable lens camera (it’s an Olympus micro-4/3rds camera), and I’ve had a lot of fun playing with a range of lenses (see below).

2. iPhone 5s 64 GB (Apple)

This is my daily smartphone, and to adapt it for the mission I popped out the SIM card and run it in airplane mode. I use it sparingly for posting updates on InstagramFacebook, and Twitter! It’s also used as my podcast and music listening device of choice, and there are a few apps that I purchased specifically for the mission.

The app that it’s currently running is Triggertrap Mobile app, which turns my iPhone into a very flexible intervalometer for doing time lapses (like this one) and long-exposures like this:

OLYMPUS DIGITAL CAMERA

3. Triggertrap Mobile Dongle (Triggertrap)

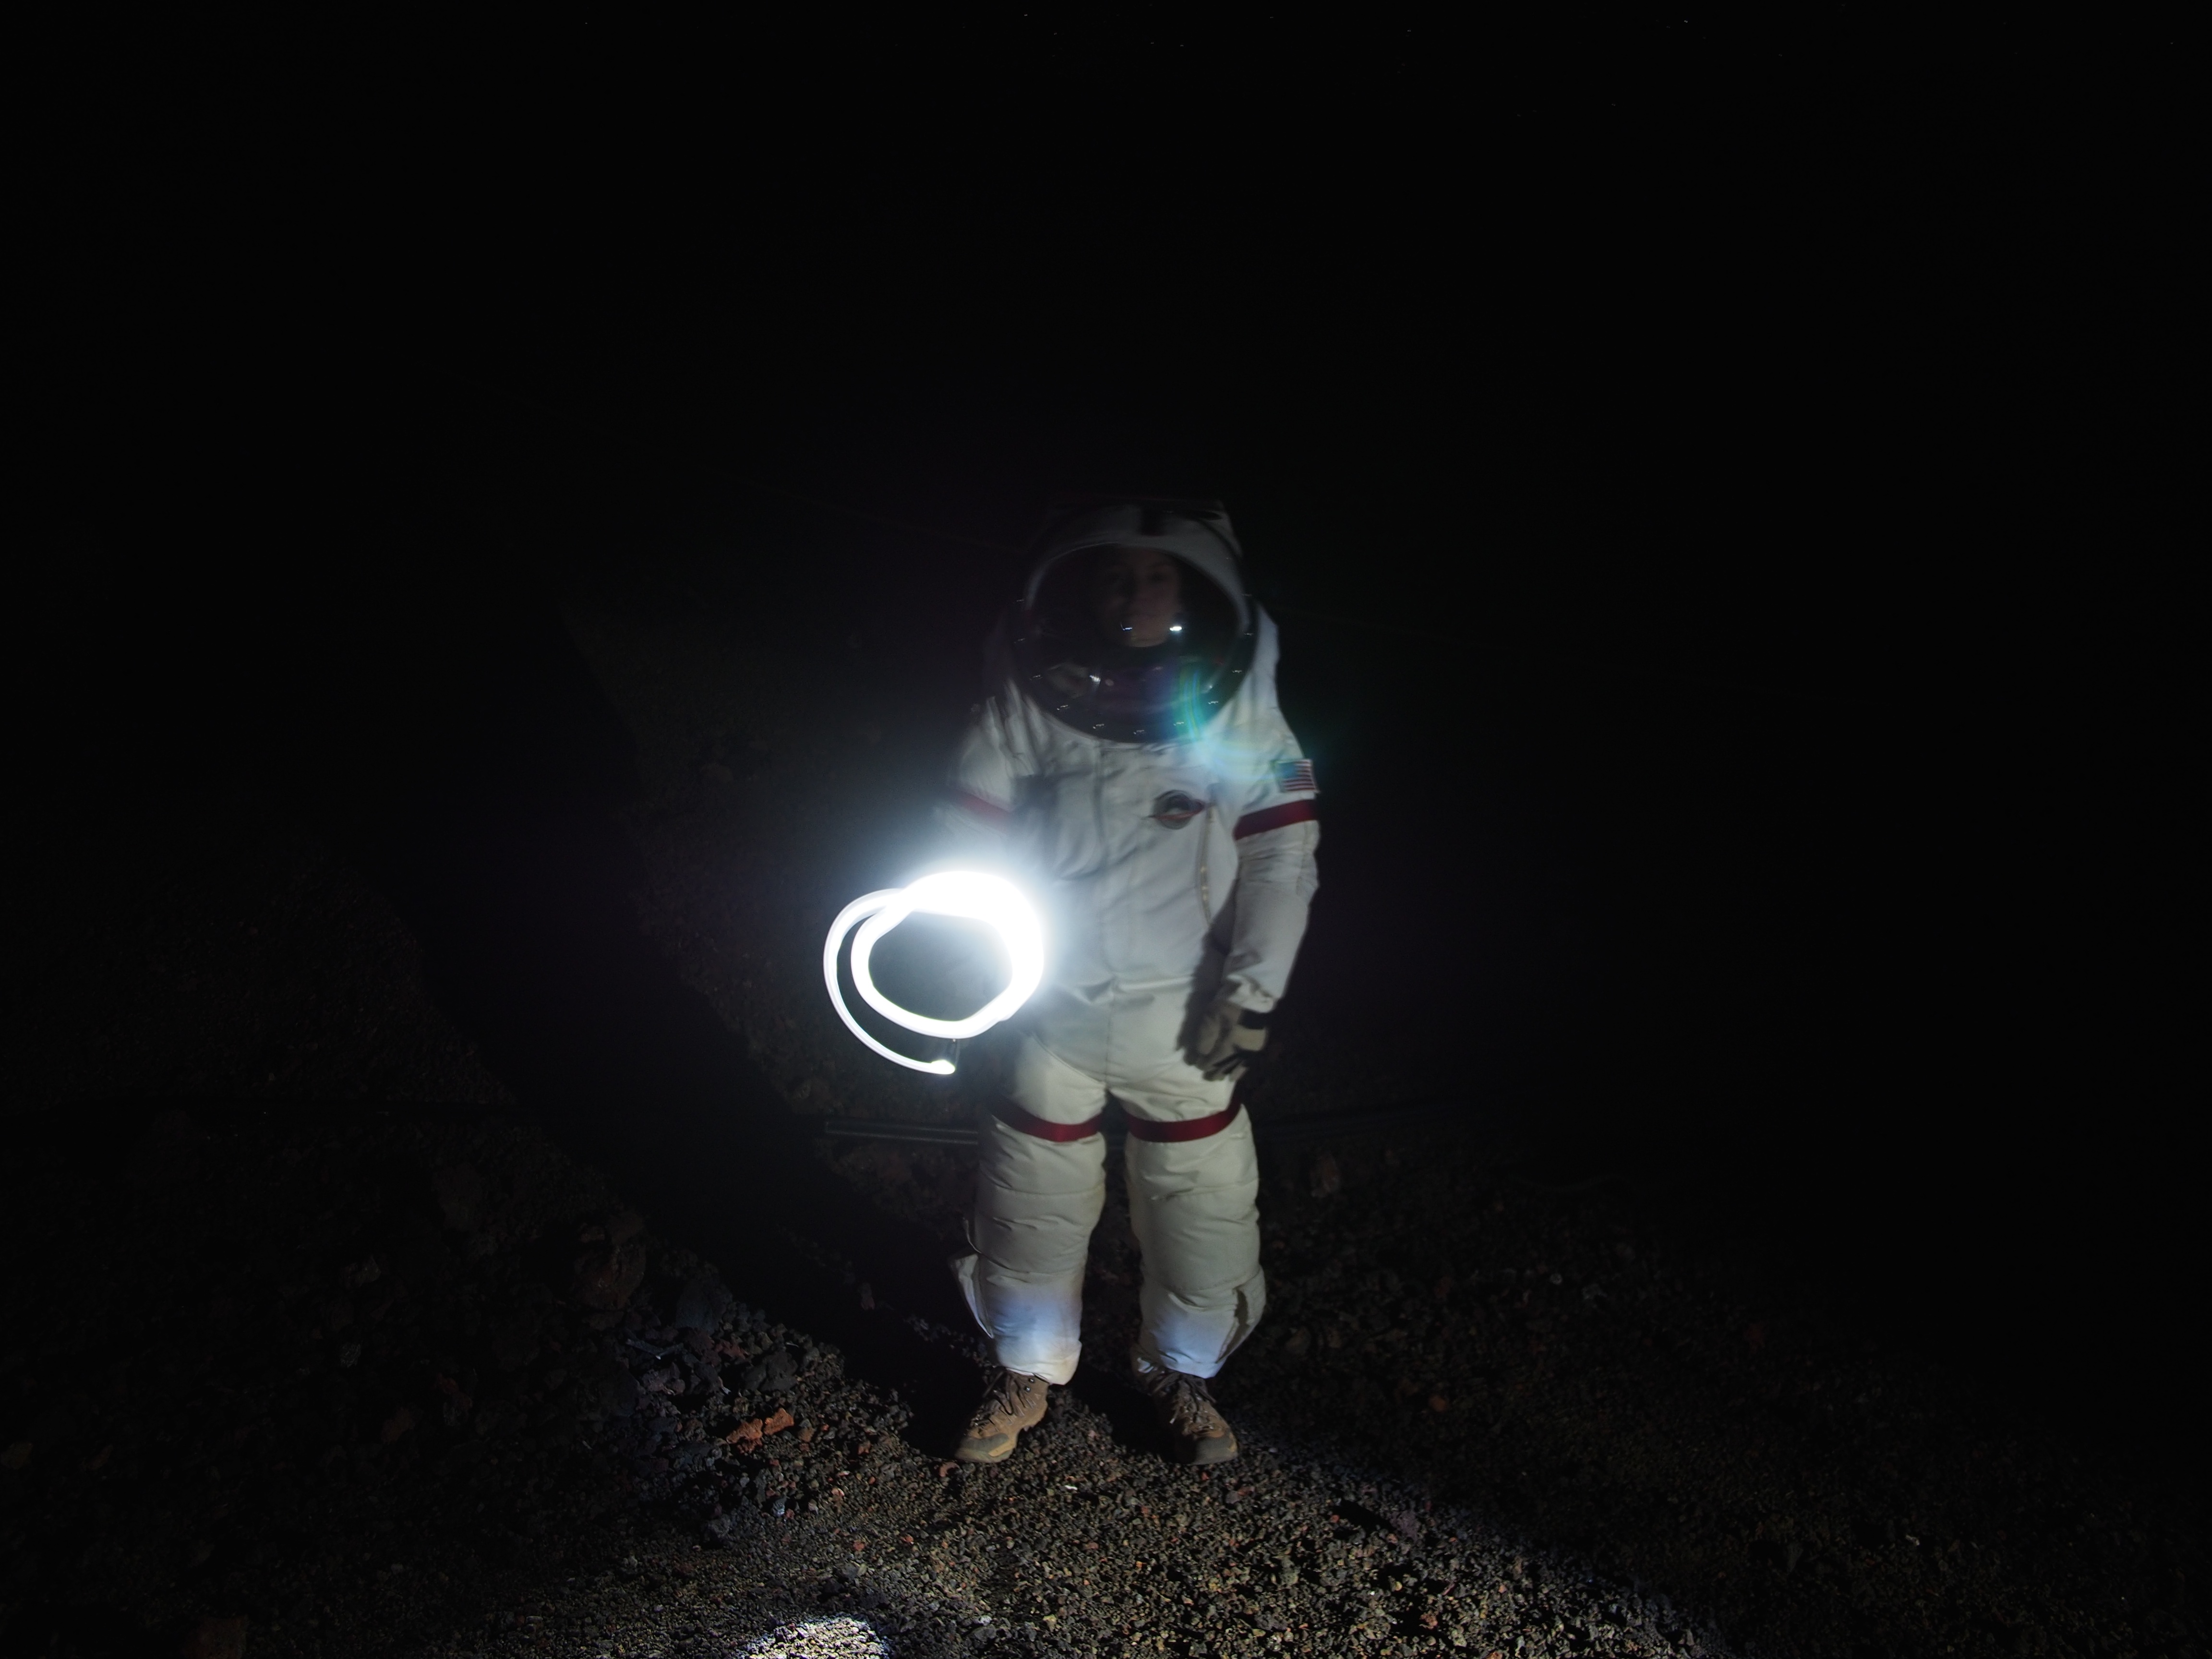
The Triggertrap Mobile Dongle is a simple cable that connects my iPhone (with the Triggertrap Mobile app) to my Olympus camera. That being said, it offers me a powerful set of tools (and I feel like I’ve barely scratched the surface). In addition to timelapses and long exposures, the Triggertrap offered me something that I didn’t even consider prior to the mission: the ability to operate my camera while in a spacesuit. This was especially useful at night when we were developing hand signals while out on EVA, because I could use a stylus to operate the camera from the Triggertrap app:

OLYMPUS DIGITAL CAMERA

4. GoPro Hero 3+ Black (MemoryExpress)

Although the Olympus camera has some incredible video settings, the GoPro proved useful because of it’s size. In many photos of our EVAs, you can see participants wearing the GoPro on their helmets. This allowed us to record hands-free, or using the GoPole (see below) offered a unique perspective. Almost my entire LogiCON 2014 presentation was recorded with the GoPro.

5. iPad Mini Retina (Apple) with Otterbox Defender Series Case (Amazon)

The iPad mini served a very important purpose for us on our EVA missions. It was by far the easiest GPS device to use. Paired with the Otterbox Defender Series Case, the iPad took quite the beating while out on EVA, with no physical damage to the iPad itself. The app being displayed is GaiaGPS, which can incredibly download and save for offline viewing the entire Island of Hawaii’s Google satellite view.

6. Apogee 96k MiC (Apple)

While rarely used, the Apogee MiC was originally purchased so I could record my own podcast while in the dome. Unfortunately, we were much busier than I anticipated, so there is only one episode available so far. I’ll try to record another podcast post-mission.

7. Panasonic LUMIX 14mm F2.5 Lens (McBain)

The 14 mm lens is the most used lens in our arsenal, mainly because most of the photos that we take are either inside the habitat (and so close to the subject) or outside on EVA (and hence landscape). I’m very impressed with the performance of this lens, especially how quickly it autofocuses.

8. Olympus PEN MSC 45mm F1.8 Lens (McBain)

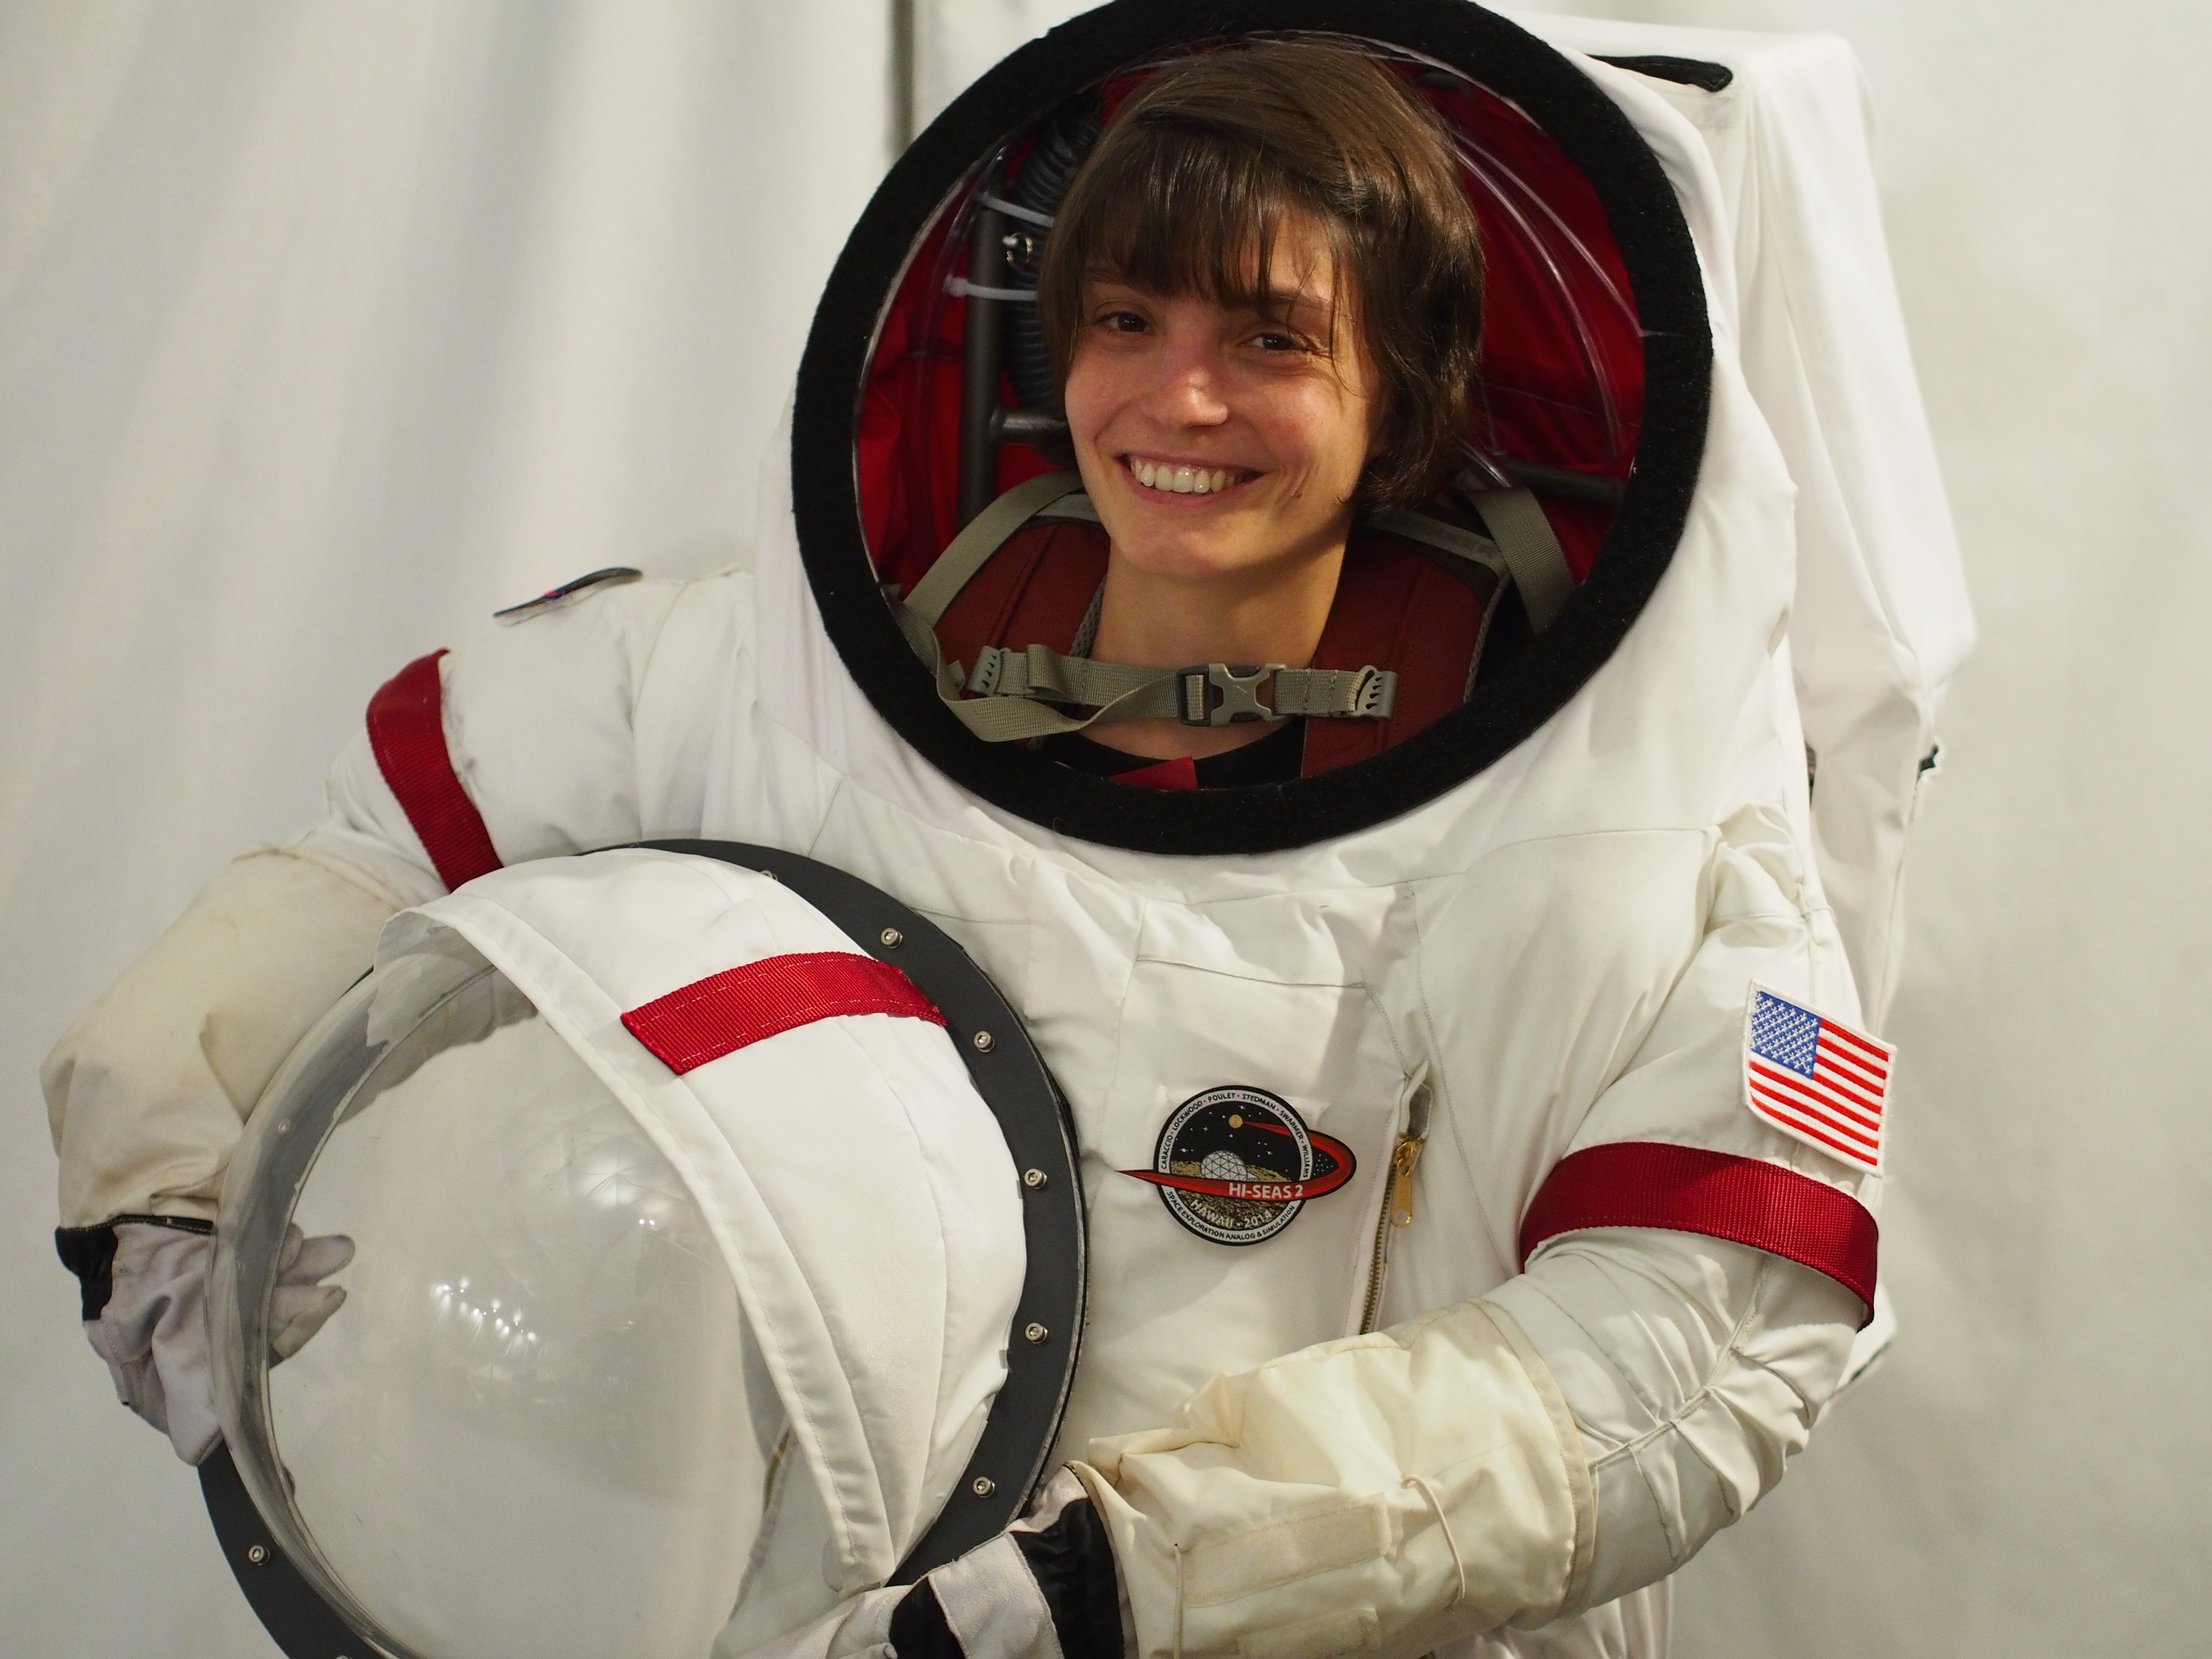
I bought the 45 mm lens after being blown away by the kinds of portraits it could shoot. Since it’s a fixed focal length lens with a long focal distance, it means that to shoot a good photo, you have to be fairly far from the subject. In the habitat, that means you need to be halfway to the other side of the dome in order to get enough of your subject in the frame. My favourite photo from this lens is a portrait of Lucie Poulet:

OLYMPUS DIGITAL CAMERA

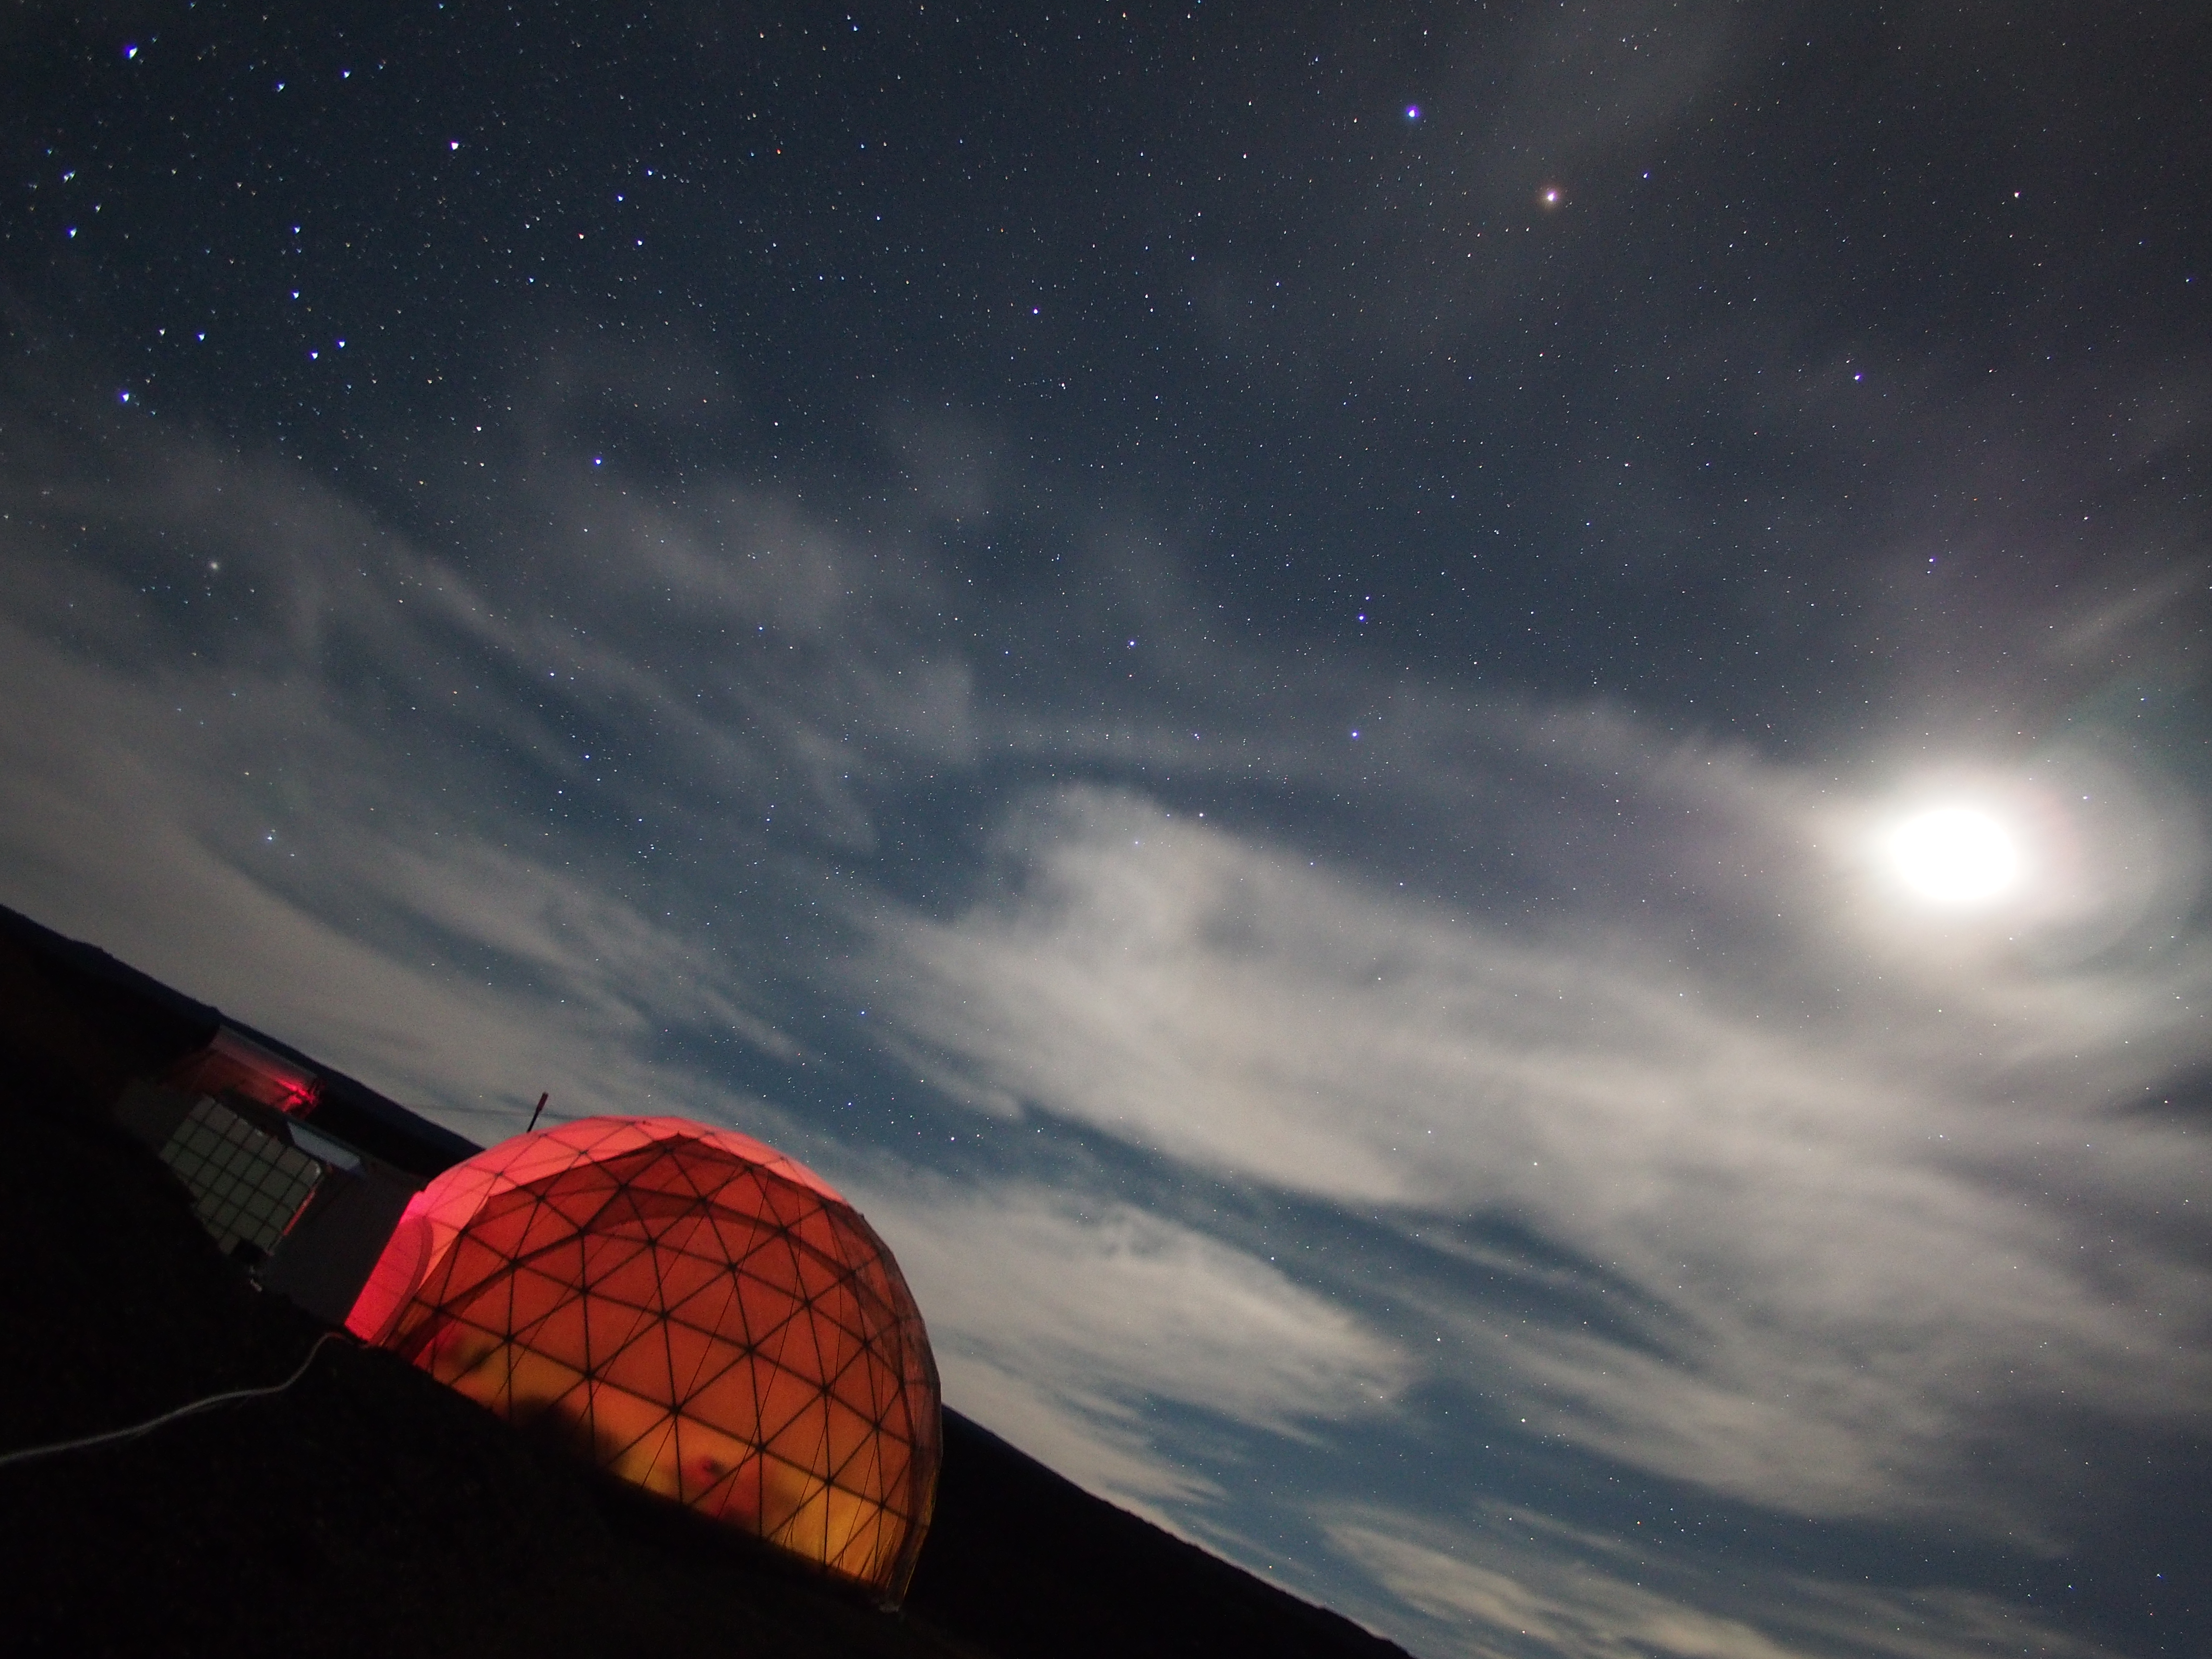
9. Canon 600 mm Zoom Lens (Courtesy of Dr. Ron Williams)

I used this lens on occasion for astrophotography, but unfortunately it’s one of the most difficult lenses to operate in a spacesuit since it is a Canon lens on an adapter for the Olympus body. That means that focus and zoom are completely manual operations, which isn’t an easy task when your trying to set up a shot of the Moon.

10. Olympus 12-40 mm Zoom Lens (McBain) in Nauticam Port & Zoom Ring Kit (International Diving Centre)

Another rarely used lens, this one came with the EM-5 as part of the kit. The Zoom Ring Kit lets me use this with the…

11. Nauticam Olympus EM-5 Underwater Housing (International Diving Centre)

This is a proper scuba housing for the EM-5, and because there aren’t lakes and oceans on Mars, I haven’t been able to try this guy out to it’s potential. I wanted to have the Nauticam housing so I could carry my camera on EVA and use all the controls with the thick EVA gloves on, but it ended up being to difficult to see the display through the back panel, so I only brought it out on a few occasions.

I am, however, looking forward to getting this kit wet scuba diving after the mission!

12. GoPole Grenade Grip (Futureshop) with GoPro The Frame (Amazon)

Just a handy little housing that I used for filming inside of the habitat. With The Frame, you get much better audio than you do with the regular waterproof GoPro housing, so most of my indoor footage was shot with the two in combination.

13. GoPro Quick Release Suction Cup (MemoryExpress)

Pretty straightforward little device. Press the suction cup against something smooth and go! We used the suction cup all the time when filming from within the MX-C suits, because we could stick it right to the helmet!

Ross takes a GigaPan image of the HI-SEAS environment. Photo by Annie Caraccio.

14. Joby Gorillapod Hybrid Tripod (Mountain Equipment Co-op)

Purchased mainly to hold the Apogee MiC, the Gorillapod has been handy to quickly set up a GoPro for recording. Wherever the big tripod can’t fit, the Gorillapod takes over.

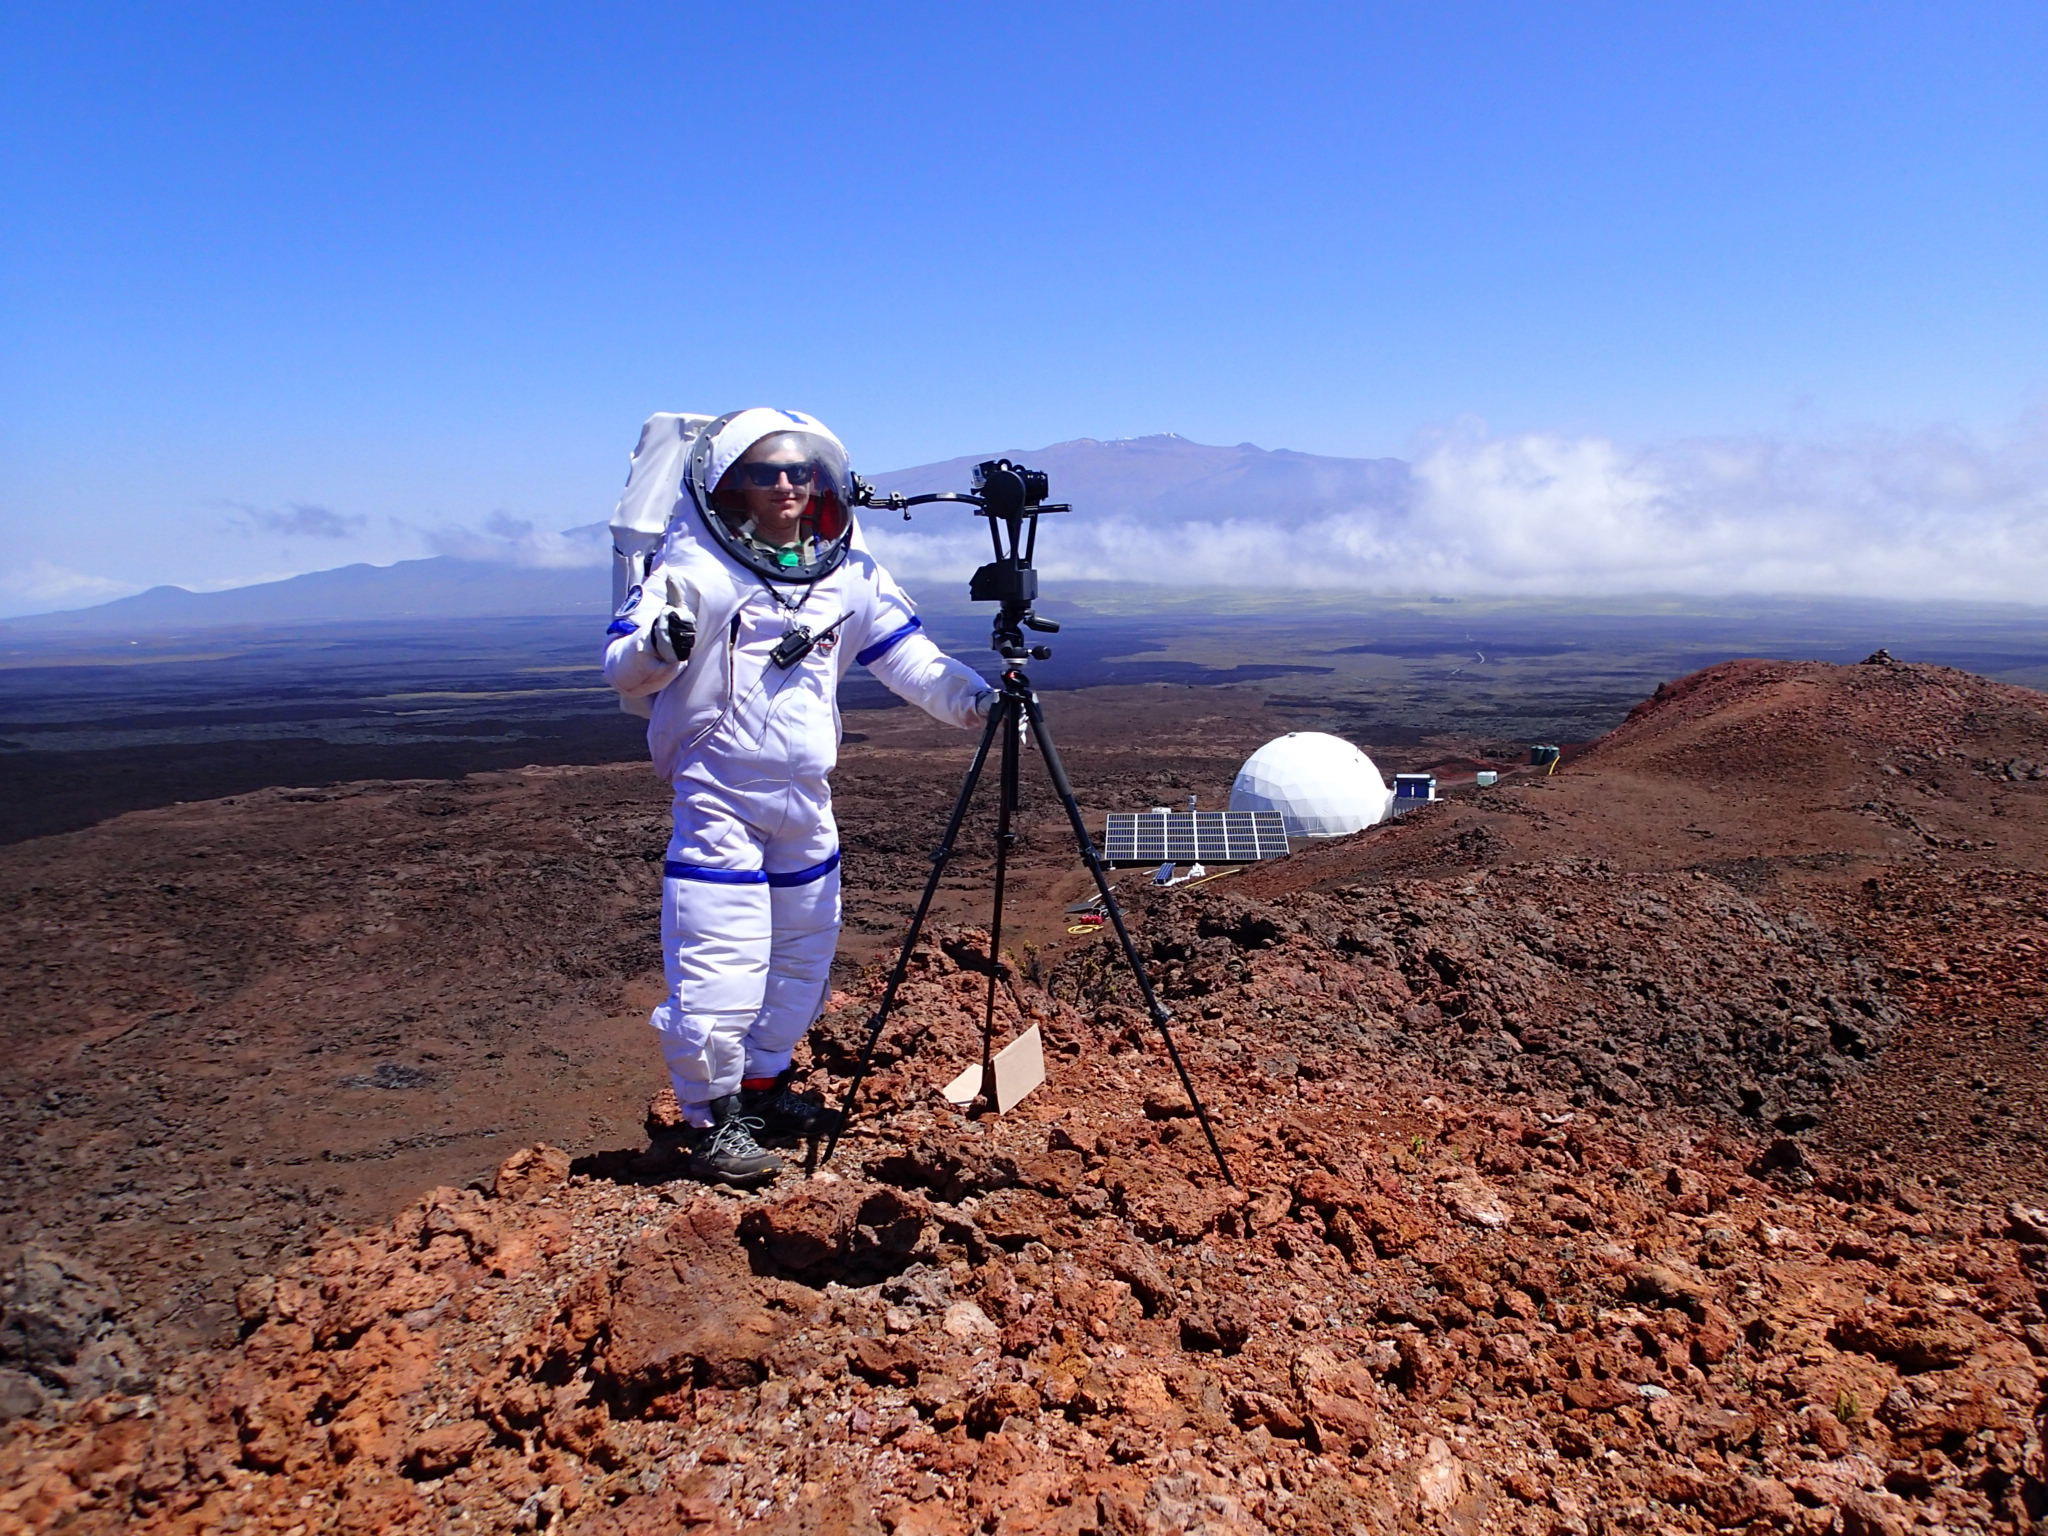
15. GoPole REACH Telescoping Extension Pole (MemoryExpress)

This is the extension arm I use to shoot a lot of the outdoor footage in the LogiCON presentation. It allows you to get the GoPro far enough away so that you get your self(ie) in the frame, along with a lot of interesting landscapes!

16. Power Pond 1C Powerbank (Mountain Equipment Co-op)

This nifty little battery has come in handy for a variety of reasons. First of which, it’s primary purpose, to charge things! I’ve used it to charge up my iPhone while running a timelapse, when a plug-in charger wouldn’t cut it (on top of a mountain for example). The Power Pond has a built in flashlight, laser, and UV light as well, which have been used on several occasions (the next HI-SEAS crew should look for hidden messages written with laundry detergent (it fluoresces)).

Overall, my kit has served me very well with my outreach efforts, and there are still lots of pictures and videos that I haven’t had the time to publish. Over the next year or so, expect that I’ll be digging up a few photos and videos!

Hubsan Holiday Gift Guide

Edit: this page is long out of date. For a more recent overview please read this Reddit thread on the Hubsan X4.

I’ve been asked on numerous occasions for my recommendations on getting started with a Hubsan X4 (version 2). Here’s a quick shopping list to help you pick up the quadcopter from Banggood. Please note that I’m linking via affiliate links, so I’ll get a small kickback from Banggood that I can use towards a future purchase.

  1. The Hubsan X4 (version 2): This is the quadcopter package. It includes the Hubsan X4 flier, the controller, one LiPo battery and charger, and an extra set of propellers. You’ll need a set of 4 AAA batteries to power the controller. If you’re given a choice between Mode 1 and Mode 2 and you have no idea what the difference is, choose Mode 2 (left hand throttle).
  2. A 5-pack high-capacity batteries: These bad boys have 52% more power than the defaults, which will give you closer to 15 minutes of flight than the standard 10. The tradeoff is a little extra weight (and momentum), but they just barely squeeze into the battery compartment. If you’re planning on adding a camera (more on that later), you probably want to use the regular batteries, available as a 5-pack here.
  3. Since you’ve got the extra batteries, grab 2 of these chargers. That’ll bring your charger total up to 3. It takes about 45 minutes to charge the batteries, so given the 15 minute flight time, you can have three charging at once, one resting and one flying at any give time.
  4. Extra propellers. Get yourself at least 5 sets of these bad boys. As far as consumables go, the propellers are at the top of the list. Every time you graze a wall or slide off the edge of a table you’ll bend or mar the propellers. Luckily you don’t have to replace all four at once, and they are labelled with A’s and B’s to help you replace them, so 5 extra sets will go a long way. If you’re feeling adventurous, grab a coloured set or two.
  5. You’ll also need some spare motors and a spare body. This is damage control. The Hubsan’s motors are very fragile. Expect to go through at least 4 motors, 8 if you are new to remote control aircraft. These are good to have on hand, and it’s good to practice your soldering skills. Red/blue motors are for clockwise rotation, white/black are for counterclockwise.
  6. If you’ve never touched a remote-control-anything before, you might want to grab this protective cover. I’ve never used this myself, but I might have wanted it if I knew what learning to fly the Hubsan was like. Not essential, but maybe peace of mind for some of you out there.
  7. If you’re really gung-ho about this whole thing, grab yourself a keychain camera and a microSD card. I use an elastic band to hold the camera on the bottom of the Hubsan, but you can be inventive!

That’s it. A quick tally brings my shopping cart to up to $97.53 (without the camera). Of course, your choices will vary from mine, and I make no guarantees. Banggood has reliably shipped my items in about 3 weeks with their (free) standard shipping options. Sometimes the items come in separate packages weeks apart, but they never fail to arrive. On the one occasion that I was worried, Banggood support reassured me to be patient, and lo and behold the complete order arrive a few days later.

Note: the Hubsan quadcopter is not a child’s toy. It’s a big person toy. It takes patience and practice to be able to fly this little beast. YouTube tutorials are your friend. Expect to sink 10’s of hours into practicing before you can do anything spectacular. At first, you’ll need to master hovering, then maybe move on to nose-in flying, then circuits, and finally the pre-programmed flips. If you’ve seen my skills, know that I have a childhood of remote control experience, and at least 50 hours on the Hubsan now.

Good luck, and happy flying!

Hubsan X4 Quadcopter Review

Edit: this page is long out of date. For a more recent overview please read this Reddit thread on the Hubsan X4.

I used some of my birthday money this year to revive a hobby that I’ve been interested in since I was young: remote control vehicles. I’ve owned everything from R/C cars and boats to gas powered R/C planes and palm sized UFOs. Lately, however, I haven’t been able to justify owning a large model or a gimmicky little model, but when I set eyes on the Hubsan X4 quadcopter, I couldn’t say no.

The Hubsan X4 is a great little quadcopter. The box contains the little bug shaped flier, a digital radio, a USB battery charger, and a small Li-Po battery. The radio has 4 channels, which allows control over the throttle, yaw, pitch and roll of the quad, as well as trimming the quadcopter so that it hovers without sliding or rotating, and a beginner and expert mode which tune the stick inputs to be less and more responsive for each mode respectively.

The X4 is not a toy, however, and it should be treated with the respect of a full scale counterpart. Beginners that are just getting used to flying a 4 channel model will face a steep learning curve, so here are some tips for flying it:

  1. The X4 needs a level surface to calibrate itself once it’s been powered on. The “eyes” of the X4 will go solid once the calibration has been set, but I’ve found the more advance calibration procedure should be performed before each flight (YouTube link). To calibrate the X4, turn the power on the radio with the throttle all the way down, and attach the battery to the X4. With the X4 on a level surface, put the flier into expert mode by pushing the right hand stick in, then, holding the left hand stick in the bottom right corner, move the right hand stick left and right until the LEDs on the X4 flier flashes. The video clears this up quite well.
  2. If the X4 ever “crashes” cut the throttle to zero immediately! If the motors are unable to rotate during a crash, they will burn out quickly. This was one of the first lessons I had to learn with this quadcopter.
  3. Sometimes after a crash one or more of the motors will be “jammed” and won’t rotate freely if they are flicked. This can sometimes by repaired with a pair of pliers. With one side of the pliers apply pressure to the top of the motor housing (not the axle), press the other side of the pliers to the centre of the bottom of the housing. Sometimes I hear a little ‘click’ as the axle unjams, and then the motor can rotate freely again. This can only be done a couple of times before the motor needs to be replaced. (YouTube link)
  4. Replacing a motor is very simple, if you’ve had previous experience with fine soldering. The motor leads come off the board with a little heat and tugging, and they go back on just as easily. It would be pretty easy to cover both of the board contacts with solder if you haven’t done fine soldering before, so if you have someone with experience it would be best for them to show you.

Here’s a great overview to modify the X4 flier before you take it for a spin that will help with a lot of headaches: YouTube link. The details of quadcopter flight are very cool, so if you want to learn more about it, check it out: Wikipedia link.

If you are considering buying this toy, I would recommend that you buy plenty of spare parts so that the damage you incur over your first few hours of flight can be repaired right away. So here’s my shopping list for a first time flier:

– 1 Hubsan X4 Quadcopter and Radio (Banggood.com, DX.com)

– 5 sets of propellers (Banggood.com, DX.com)

– 2 extra batteries (Banggood.com)

– 4 extra motors (Banggood.com)

– 1 extra X4 body (Banggood.com)

For that kit, it works out to $64.45 USD with shipping from China on Banggood.com. If you can find additional chargers for the Li-Po batteries buy those too. Charging takes about 45 minutes, while a full battery will be depleted after about 10 minutes of flight.

For less than $65, the Hubsan X4 quadcopter is an excellent gift for a past R/C enthusiast or someone interested in practicing flight controls before buying a bigger model. Everyone delights to see it fly and it is a ton of fun! Happy flying!

2013-04-24 19.40.36Update:

An updated version of the Hubsan X4 has been released. I haven’t got my hands on it yet, but I’ll make some comments when I do. Read more about the Hubsan X4 V2.

The Mathematics of Crime with Dr. Andrea Bertozzi

Dr. Andrea Bertozzi from the Department of Mathetmatical Sciences at UCLA, visited the University of Alberta last night to give a talk entitled, “The Mathematics of Crime”. I’ve collected a number of interesting notes and links if you’d like to follow-up on her talk.

Dr. Bertozzi’s recent work culminated in a spinoff company called PredPol, which develops software used to predict the locations of crime-based “hotspots”, where increased police enforcement can be deployed to help prevent crimes. The technology is a far cry from the technology used in Minority Report because it can’t predict the behaviour of individual criminals or predict specific crimes, but because of its statistical nature it has been able to reduce to total number of crimes. In 2011, the Santa Cruz Police Department reported a 27% reduction in crime from 2011 after implementing PredPol. Due to its success, Bertozzi and her peers have been profiled nationwide, including a very informative video by NBC.

Dr. Bertozzi’s work began in 2005, when her interest in a topic called “Predictive Policing” began. Using existing models to predict earthquakes and aftershocks, Dr. Bertozzi, along with Dr. Jeffery Brantingham (Anthropology UCLA), Dr. George Tita (Criminology, UC Irvine) and Dr. Lincoln Chayes (Mathematics UCLA) wrote a paper entitled “A Statistical Model of Criminal Behaviour” (link). Using discrete mathematical modelling, a number of research papers on the topic of crime have resulted: Nonlinear Patterns in Urban Crime: Hotspots, Bifurcations, and Suppression (link) details the growth and movement of criminal hot spots (which look and behave suspiciously similar to magnetic domains in Ising Models); Adaptation of an Animal Territory Model to Street Gang Spatial Patterns in Los Angeles (link) ties migration patterns and territory of coyotes in Yellowstone Park to gang territories in Los Angeles; and Reconstruction of Missing Data in Social Networks Based on Temporal Patterns of Interactions (link) shows methods of reducing criminal suspects mathematically based on their locations and interactions with nearby gangs.

Overall, the talk was very informative and well presented, and it made me consider aspects of my neighbourhood, like graffiti and past crimes, on how criminal behaviour can be predicted.